This Article contains the following:
Step 1 – Configure a Radius-Server
Step 2: Setting up the RADIUS Client
Step 3: Handing over the login control
Firmware 2.02 or higher is required for this function. The necessary firmware update can be downloaded free of charge at www.generex.de . This function is available directly after the firmware update.
What is "RADIUS“ ?
RADIUS is the abbreviation for Remote Authentication Dial-In User Service. In principle, the point is that with a growing number of end devices such as printers, access points, switches, routers, etc. in conjunction with more and more staff that dynamically access the configuration menus, someday the point is reached where the time required for setting up, deleting and re-encrypting users becomes time intensive. With a functioning RADIUS, one can centralize the necessary approvals and no longer have to maintain users and their approvals locally on the respective end devices.
Roughly speaking, it works like this:
The end device is informed of "its" RADIUS server, where it can ask whether a user exists and which authorization a requested user holds within the network. The RADIUS server accepts the request, compares its user database and responds accordingly. As a result, an end device does not have to maintain its own user database, which of course also has to be maintained exclusively in case of staff or passwords change.
A little more practical:
Imagine the following work order:
15 access points from different manufacturers, on which 3 users must be decrypted, 2 users receive other approvals and 1 user is added. For the administrator, this means that he has to handle 15*6 users, i.e., he has to change a total of 90 user data, has to log in exclusively to each end device, and thus, in the worst case, needs 15 passwords and has to choose between "admin", "administrator", "root", etc... An immense effort that arises for just 6 users.
With a RADIUS server, there are ultimately only 6 users, which are also stored centrally. In this case, the end devices do not have to be touched at all, as they ask the RADIUS server who is allowed to log in.
From a certain network size / number of end devices and staff strength onward, it makes sense to consider using RADIUS servers.
Configuring a CS141 to use a RADIUS server
Necessary prerequisites:
- A RADIUS-Server that is running
- Access data and, if applicable, certificates
- Network connection for the CS141 and local administrative access (Super User or “Administrator”)
Note:
For this configuration tutorial, we use the FreeRADIUS for Windows, as it is relatively easy to set up and is quickly ready for operation even for inexperienced users. For more in-depth configurations and the RADIUS server you use, please contact the corresponding technical support for your product. The FreeRADIUS for Windows is available via download from the Internet (e.g., visit Sourceforge for a downloadlink).
Step 1 – Configure a Radius-Server
These are the following subcategories of this step:
Setting up a RADIUS user at the server:
The machine account for the CS141:
The Pre-Shared Key (Shared Secret at the C141)
Typical Test Setup for a RADIUS Server
Setting up a RADIUS user at the server:
In this configuration, we assume that the IP address is well-known, and the RADIUS server is installed in the following directory:
C:\FreeRADIUS.net
In this directory, you will find the *.exe -file to start the RADIUS server …
Please ensure both, to install and to run this program "as administrator “, otherwise you may run into problems when running the server program.
The necessary configuration files can all be found in the following directory:
C:\FreeRADIUS.net\etc\raddb
Here, the file "users.conf" is particularly interesting.
Two users have been entered in this example. The following specifications currently apply to the CS141:
Administrative-User
This is the local CS141 user role „Administrator “.
Login-User
This is the local CS141 user role „Engineer “.
Customer, Guest, etc. are currently not supported, they will be added with the next firmware updates.
The machine account for the CS141:
This is the account that the CS141 needs when it wants to log on to the RADIUS server. Without this account, the CS141 will not be able to ask the RADIUS server for custom users - the RADIUS server will drop the query without a reason.
However, this account is also specified in the file "users.conf". In this example, the user’s name and password with which the CS141 logs on to the RADIUS server is called:
- User: FreeRADIUS.net-Client
- Password: demo
The Pre-Shared Key (Shared Secret at the C141)
In addition, the CS141 will ask for a "pre-shared key", which can be found in the file "clients.conf":
In this case the pre-shared key is
"testing456"
And is valid for the network 192.168.150.0/24 - You may have to adapt this setting to fit to your network. Why you need this configuration: Only if the CS141 first transmits this key before the request, the RADIUS server will feel compelled to process this request. In all other cases, the RADIUS server will simply drop this request.
From now, you have all the information needed for the configuration of the CS141.
Note:
After each configuration work, do not forget to restart the RADIUS server, otherwise the new configurations will not be available.
The "Debug-Mode":
Before configuring the CS141, ensure that the RADIUS server is correctly configured and started, it can easily be done via the context menu of the RADIUS icon on the taskbar. Start, Stop, Debug mode, etc. are clearly and directly accessible.
The debug mode comes with a special feature:
On start, a CMD window opens in which the RADIUS server shows what it is currently doing and especially interesting why a request was rejected:
At the end of the start routine, it says "Ready to process requests":
- If the window closes again immediately, then something is wrong in the RADIUS server, probably something is wrong in the entries you made yourself.
- In any other case, you can use this window to monitor whether and how your test setup sends requests to the RADIUS server and how the RADIUS server responds.
- To stop the RADIUS server, simply close the debug window and the RADIUS server is "OFF" until the next start, which is very practical for quick test runs.
Typical Test Setup for a RADIUS Server
Before we set up the CS141, we should consider how the RADIUS server is to be addressed in the first place:
With the settings made, you can already run a RADIUS server on any PC for test purposes.
If you look at the screenshot above in the section "Preshared Key" again, you will find the following entry (If this is not included, please add it, make sure that the private network has a sequential number
client 10.0.0.0 / 8 {
	secret	= testing123
	shortname = private-network 3

}
So, in this case, the IP address range 10.10.10.0 - 10.10.10.254 is included in the RADIUS - pool, and the RADIUS server will answer in any case if the computer and the CS141 have a matching IP address.
In this tutorial, you will assign the IP address 10.10.10.12 / 255.255.255.0 to the network adapter of your computer. 1.
- As soon as you connect a CS141, it is directly accessible in configuration mode (slide switch in the middle) and during the initial setup via the start IP 10.10.10.10.
- As soon as you set up the RADIUS function on the CS141, the CS141 will send the request to the IP 10.10.10.12 and the RADIUS server will respond accordingly.
Before proceeding to step 2, make sure that
- the slide switch is in the left position
- the IP address is set to 10.10.10.4.
- Your PC to the IP address 10.10.10.12.
- The RADIUS server is running in debug mode to see what is happening.
Step 2: Setting up the RADIUS Client
These are the following subcategories of this step:
IP address, Port and Shared Secret
Setting up Timeouts and Retries
The Radius Client User / the machine account
When the RADIUS server is running, it will be possible to configure and test the CS141
At RADIUS Servers, click the edit - symbol to open the configuration dialogue. The CS141 supports up to two RADIUS servers, which are queried one after the other.
IP address, Port and Shared Secret
- IP address: Enter the valid IP address of the RADIUS server.
- Port: Enter the port on which your RADIUS server is currently listening.
- Shared Key: This key is used to authenticate the response of the RADIUS server - without this key, the server drops a request on principle.
Select your encryption method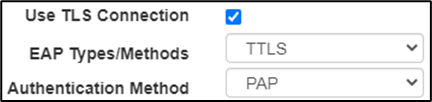
Encryption has become a technical standard within modern networks. The CS141 therefore supports numerous encryption methods and can thus be adapted to the most diverse requirements within the network infrastructure. Please note that you may need additional certificates and do more configuration work that this example configuration describes.
If you plan other encryption methods, please refer to the local responsible system administrator.
Setting up Timeouts and Retries
The timeout is set in seconds and defines how long the CS141 waits until it considers the request is lost. The default value is 30 seconds.
With the Retries, it is possible to set how often the request should be repeated before the CS141 finally gives up and asks the second RADIUS server.
Please note that timeout and retries are working together may lead to users waiting a very long time for a response in case of RADIUS is not accessible.
The Radius Client User / the machine account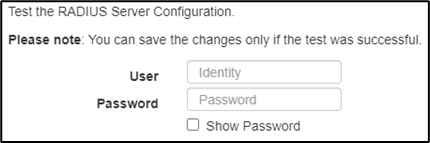
In order to be able to communicate with the RADIUS server, the CS141 requires its own valid account, via which the CS141 can connect to the RADIUS server to ask for valid user IDs.
For valid login data, please refer to the responsible system administrator.
Test, Save and Cancel
Entries can only be saved after all data has been entered correctly and the connection test to the RADIUS server has been successful.
Step 3: Handing over the login control
-
Switch from Local Authentification Only to RADIUS, then Local Authentification:
- press “apply”.
From now on, you will be able to test your RADIUS configuration. If something is wrong, the local Super User “admin” is still active and availale. If something is wrong, just disable the RADIUS server for this CS141.
RADIUS with Microsoft NPS and Cisco ISE
This guide goes into a lot of detail about FreeRADIUS, which won't help you much with Microsoft NPS or Cisco ISE.
The distinctions between Microsoft NPS, Cisco ISE, and FreeRADIUS are as follows:
In FreeRADIUS, the user role is stored as a STRING, whereas both the Microsoft NPS and the Cisco ISE work with the INTEGER:
| CS141 Role | Service-Type (Numeric) | Service-Type (Name) |
| Administrator | 6 | Administrative (Administrative-User) |
| Engineer | 1 | Login (Login-User) |
| Guest | ? | ? |
For assistance with configuring a Radius 802.1X, please refer to the following link to access the relevant article on this subject:
v.: 2025-07-23 FW 2.16-2.26
Comments
0 comments
Please sign in to leave a comment.