This article contains the following:
Installation: Windows with GUI
Silent Install with an options file
Differences from VMware
How the principles of functionality differ from RCCMD for VMware:
In its function as a valid RCCMD server, the CS141 usually sends control signals to a client, which implements the corresponding commands depending on the configuration. There are two basic possibilities:
- Both the signal and the sending device are valid.
- The signal itself is correct and valid, but the sending device is not listed.
The difference between VMware, Hyper-V and a single server becomes more apparent when looking in detail:
With VMware, different virtual machines normally run on one physical host. When the RCCMD appliance is in use, RCCMD does not communicate with the virtual machines, but only with the physical host itself. Both the number of virtual machines and the number of hosts are irrelevant:
As soon as the IP address is known, the RCCMD appliance can communicate with the corresponding host. Due to this fact, the RCCMD appliance can be configured to contact as many hosts as wanted - independent of its own host. If you can roll out an OVA file, you will be able to run the appliance. Furthermore, the virtual machines are not touched by the RCCMD appliance. In this context, shutting down or moving is a matter between the host and, if applicable, the vCenter.
Windows-based operating systems and Hyper-V differ:
On Windows operating systems, you have the option to run virtual machines using Hyper-V. When the Windows operating system is shut down, Hyper-V takes over the coordination of moving and shutting down individual virtual machines. Since RCCMD is not a virtual machine but a running program, you operate at the level of the local administrator, as is known from a standalone system.
It is possible to run jobs and trigger local scripts to automate everything on the server itself. With a Hyper-V cluster, RCCMD shuts down the local Windows computer, and Hyper-V will take care of the whereabouts of the virtual machines. This eliminates some menus that are important for VMware and replaces them with other menu items that are only possible with standalone servers. As a consequence, you need an RCCMD client for each individual server.
Installation: Windows with GUI
First, unpack the file completely (do not confuse it with the preview in Windows) and change to the unpacked directory.
To start the installation, run rccmdinstaller.exe:
First select the language in which you want to carry out the installation. Please note that this language selection has no influence on the RCCMD client itself - you can adjust it later when configuring RCCMD.
After choosing your preferred installation language, click on OK to start the installation.
The installation dialogs
The installation dialog is straightforward and guides you through the complete installation process.
When ready to begin, click „Next “
Note
The installation is divided into two parts. During the first part, RCCMD asks you to enter parameters. When the installation is aborted, the installation dialog quits and discards your choices. Part two is the installation itself – On your mark, RCCMD will start the installation as configured.
Step 1: Copyrights, terms of usage
and license information
In this step, you can review the license agreement. To continue the installation, you must accept these terms. If you do not agree, the installation process will be terminated without making any changes to your system.
Accept the agreements and click „Next “
Step 2: Enter the license key
The RCCMD license key is either included with your CS141 or sent to you by email from your local dealer. Enter the license key and click on "Next" - The installer automatically checks the validity and informs you in case of an issue.
If you do not have a license key at hand, leave the field empty and click directly on "Next", and RCCMD will automatically use an internal 30-day evaluation key.
When finished, click “Next“.
Step 3: Choose your setup type.
The standard installation uses default installation paths and comes with a recommended setup for modules and ports.
The Custom Installation is aimed at experienced users and system integrators who want to adapt general RCCMD functions like installation path or port settings to the target system during installation.
When finished, click “Next”.
Step 4 – If Standard installation is selected
Installation summary
The setup dialog presents an overview of the installation work to be carried out. If all settings are OK, press „Next" to start the installation.
To review and change settings, press "Back" and select "Custom".
Press "Cancel" to exit the installation dialog, and no changes will be made to your system
Click „Back “to change your settings
Click „Next “ to start the installation process
Proceed to Step 5 – Finalizing your installation
For Custom installation
Step 3a – Custom installation
Define the installation path
The installation path determines where RCCMD can be found after installation. Usually, RCCMD uses the standard path for programs within Windows operating systems.
In case of custom program paths, the configuration dialog provides an option to specify the new path directly. Please note: If configured, changing the installation path may run into problems with system rights management
For the graphical file manager, click on the folder symbol next to the input field.
When finished, click „Next “to proceed
Step 3b – Custom installation
Program icons
The program icons are quick starters with which functions of RCCMD can be reached directly from the desktop.
If an administrator connects to the corresponding computer remotely at a later time, he may comfortably configure RCCMD locally with the quick-start icons.
If you do not want to have program icons, just uncheck.
Please make your choice and click „Next “
Step 3c – Custom installation
Select system modules
RCCMD consists of several modules that depend on each other.
RCCMD service: The central background process that manages your emergency shutdown. This module is mandatory for operation.
RCCMD Configurator: This module is the web-based configuration dialog for RCCMD. The RCCMD service may work without the configurator, but since it will harm the configuration work, we recommend installing it.
RCCMD Notifier: The notifier allows a pop-up with RCCMD messages. Furthermore, RCCMD background processes can be executed interactively with the current user. This module can be very helpful when using your own scripts.
Select your modules and click „Next"
Step 3d – Custom installation
HTTP / HTTPS and Web Console Password
By default, RCCMD uses HTTPS for its web interface. An integrated certificate is available for this purpose. With this setting, define whether HTTP or HTTPS is to be used as standard.
TCP/Port: RCCMD does not respond to every port to requests to the web interface. The default port is 8443. If you want to use a different port, please specify.
Password: Set the password for the RCCMD web interface login. If you want to set the password later, leave the field as it is. RCCMD will then use the standard password "RCCMD".
After configuration, click „Next “
Step 3e – Custom installation
Configuration Overview
The Summary shows your installation configuration. If some changes are needed, select "Back" until you reach the according configuration step.
„Next “will start the final installation process.
Cancel closes the installation dialog and discards the parameters you have set without making any changes to the operating system. On restart, you need to enter all parameters again.
The configuration work is done, click „Next “to start the installation.
Step 5 – Finalizing your installation
RCCMD automatically installs and configures all selected components. Afterward, configuration work can be done via the web interface by entering the IP address of the computer:
How to access the interface via web browser:
- https://127.0.0.1:8443
- https://[IP-address of the target computer]:8443
- https://localhost:8443
Password: RCCMD or your selected password.
The graphical installation of RCCMD is now completed. Please continue with the configuration of RCCMD via the web menu.
Note:
On first visit you may encounter a "certificate error":
The reason for this behavior depends on the nature of a certificate: The certificate itself is valid, but RCCMD was of course installed on a server for whose hardware the SSL certificate cannot logically be signed. The web browser notices this and consequently indicates that there might be a fake server.
With Edge, click on "Details", with Chrome on "Advanced Options" to get to the RCCMD login page.
The graphical installation is done. Please proceed to the Quick Configuration Guide in the RCCMD Manual:
RCCMD Quick Configuration: Windows, Linux and macOS
Installation via console
Core servers or operating systems via console access do not offer a GUI. The RCCMD installer automatically offers an alternative text mode for the configuration menus. The setup program will guide you through the installation process in exactly the same way as with the graphical installation.
Silent Install with an options file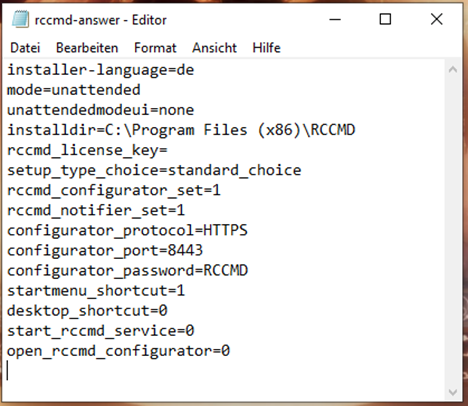
The „Silent Install“ is a special mode in which all parameters required for the installation are stored in a central response file.
How to create a Silent Install file
Open a text editor and save the file e.g., as rccmd-answer.txt. The structure of the file is without special characters or special format symbols.
Note:
To help with crafting a working options file, a demonstration file is also included within the download.
For a complete silent install, we recommend the following settings
| installer-language=de/en | Define the installer language |
| mode=unattended | Set the installation mode to silent install. |
| unattendedmodeui=none | Deny interactive questions |
| installdir=C:\Program Files (x86)\RCCMD | Select the installation path |
| rccmd_license_key= | The RCCMD key for this installation. If you do not have a key for the moment, leave the field empty. RCCMD will then be installed with an evaluation key. |
| setup_type_choice=standard_choice | Choose “Standard” for the module setup |
| rccmd_configurator_set=1 | Install the configuration interface* |
| rccmd_notifier_set=1 | Installs the messaging service for RCCMD* |
| configurator_protocol=HTTPS | Define the standard access protocol |
| configurator_port=8443 | Choose the access port for RCCMD |
| configurator_password=RCCMD | Enter the default password for the web interface |
| startmenu_shortcut=1 | Do you need a Start menu shortcut?* |
| desktop_shortcut=0 | Do you need desktop shortcuts? * |
| start_rccmd_service=0 | Shall the RCCMD service start directly after installation without configuration? * |
| open_rccmd_configurator=0 |
Shall the web configurator start directly after installation? * If your operating system does not provide a GUI, you may dismiss this step* |
* 1 = YES / 0 = NO
Command to start the silent installation: rccmdinstaller.exe --optionfile rccmd-answer.txt
The installation will be done as a background process. After installation, visit the web interface to configure the RCCMD client.
How to access the interface via web browser:
- https://127.0.0.1:8443
- https://[IP-address of the target computer]:8443
- https://localhost:8443
Password: RCCMD or your selected password.
The RCCMD Windows quick start guide ends at this point. For detailed configuration information, please refer to chapter 7 of the RCCMD manual for detailed information about the configuration screens.
v.: 2025-08-26
Comments
0 comments
Please sign in to leave a comment.